My Recent Posts

Monday, June 30, 2014

Brown Bag Utensil Holder

All of your utensils all packaged up for you.  How convenient!!  How cute!!  Such a simple process and can go along with any party theme!!
Brown Bag Utensil Holder


Get ready for barbecue season!!  How cute are these?  All you need is a small brown lunch bag, a hole punch, some twine or ribbon, and napkin of your choice to match your party theme!!  Simply fold up the bottom half of the bag, punch your hole through both layers and tie it off with some twine.  Stick your napkin and utensils right in the pocket.  
Your guests will love the convenience of trying to make your plate while holding your napkin and all of your utensils.  And of course, also how cute they are!!

Wednesday, June 25, 2014

Forth of July Punch

Are you looking for a new punch recipe?  I highly recommend this one!!  It's prime party season, try something new, and give this punch a try!!
4th of July Punch


 With the Forth of July approaching I thought I'd help some of you out with a great punch to serve at your barbeque.  With so many punch recipes out there it's hard to know which one to choose.  Over the years I've tried a lot of different punch recipes and this one is my absolute favorite!  I'll guarentee all of your guests will love it!!

1 qt. (4 cups) cold reduced calorie cranberry juice cocktail
1 cup cold orange juice
1 Tbs. fresh lime juice
3/4 cup Country Time pink lemonade flavor drink mix
3 cups cold club soda
fresh cut fruit 

On top of this being a great punch, how cute do they look?  Go ahead and use cupcake liners to top off your mason jars.  The liners look so adorable and keeps the bugs out!  

Sunday, June 22, 2014

4th of July Countdown Sign

The Forth of July is almost here (which is so hard to believe, where did the last six months go?).  Awaiting it's arrival, we needed a countdown sign (I mean doesn't every holiday?).  It turned out so cute, making an adorable addition to our Forth of July decor!
Forth of July Countdown Sign


 No matter what the holiday, my kids love a countdown!  So I decided to make them one for Independence Day!  I started out by making a small pallet sign and painting it blue.  On my cameo I designed a "4th of July" text (you could also use basic stencils).  After stenciling that on, I added the chalkboard and the red starburst (I thought they might resemble a firework).  
As usual I still wasn't satisfied, so I thought I'd add a banner in coordinating colors.  Let the countdown begin!!


Thursday, June 19, 2014

Red, White, and Blue Marshmallows

I've always wanted to give homemade marshmallows a try, and I'm so glad I did.  They turned out great and tasted delicious!  Now I know I can make them for any holiday.  Right now, seeing it's almost the Forth of July I decided to add some red, and blue sprinkles.  
Red, White, and Blue Marshmallows


 Your kids will love them!!
I found my recipe at Food Network.  For more marshmallow recipes, click here!

Ingredients
3 packages unflavored gelatin
1 cup ice cold water, divided
12 ounces granulated sugar, approximately 1 1/2 cups
1 cup light corn syrup
1/4 teaspoon kosher salt
1 teaspoon vanilla extract
1/4 cup confectioners' sugar
1/4 cup cornstarch
Nonstick spray
Directions
Place the gelatin into the bowl of a stand mixer along with 1/2 cup of the water. Have the whisk attachment standing by.

In a small saucepan combine the remaining 1/2 cup water, granulated sugar, corn syrup and salt. Place over medium high heat, cover and allow to cook for 3 to 4 minutes. Uncover, clip a candy thermometer onto the side of the pan and continue to cook until the mixture reaches 240 degrees F, approximately 7 to 8 minutes. Once the mixture reaches this temperature, immediately remove from the heat.

Turn the mixer on low speed and, while running, slowly pour the sugar syrup down the side of the bowl into the gelatin mixture. Once you have added all of the syrup, increase the speed to high. Continue to whip until the mixture becomes very thick and is lukewarm, approximately 12 to 15 minutes. Add the vanilla during the last minute of whipping. While the mixture is whipping prepare the pans as follows.
Combine the confectioners' sugar and cornstarch in a small bowl. Lightly spray a 13 by 9-inch metal baking pan with nonstick cooking spray. Add the sugar and cornstarch mixture and move around to completely coat the bottom and sides of the pan. Return the remaining mixture to the bowl for later use.


When ready, pour the mixture into the prepared pan, using a lightly oiled spatula for spreading evenly into the pan. Dust the top with enough of the remaining sugar and cornstarch mixture to lightly cover. Reserve the rest for later. Allow the marshmallows to sit uncovered for at least 4 hours and up to overnight.


Turn the marshmallows out onto a cutting board and cut into 1-inch squares using a pizza wheel dusted with the confectioners' sugar mixture. Once cut, lightly dust all sides of each marshmallow with the remaining mixture, using additional if necessary. Store in an airtight container for up to 3 weeks.

Monday, June 16, 2014

4th of July Photo Wreath

I was in need of some Forth of July decorations, so I decided to make a small wreath with this foam form I had sitting around.  I'm obsessed with anything chevron right now!  And what screams the Forth more than some stars!
Forth of July Photo Wreath

 Why not use a wreath as a frame I thought?  This red chevron burlap ribbon worked perfect to cover my foam wreath.  After it was wrapped, I added some fabric flowers and these adorable denim hearts that I happen to come across at Goodwill.  That when it hit me.  Everything I held up to give it a little wow factor, I just didn't like.  Until I thought of a photo and I loved the way it turned out.  I simply added a mini clothespin to hold the picture.  I just might have to make one for year round!!


Saturday, June 14, 2014

A Floral Friday #1

So you may have read before, that before becoming a stay at home mom, I used to own a flower shop.  With that said, I thought I'd share a couple of my secrets for making a gorgeous flower arrangement for very inexpensive!  Since I don't have the luxury of bringing flowers home for free anymore, I've realized how expensive it is to purchase enough flowers to really fill up a vase.  I'll make this real cheap and really easy for you, even if have no design skills at all!
Flower Designing Secrets
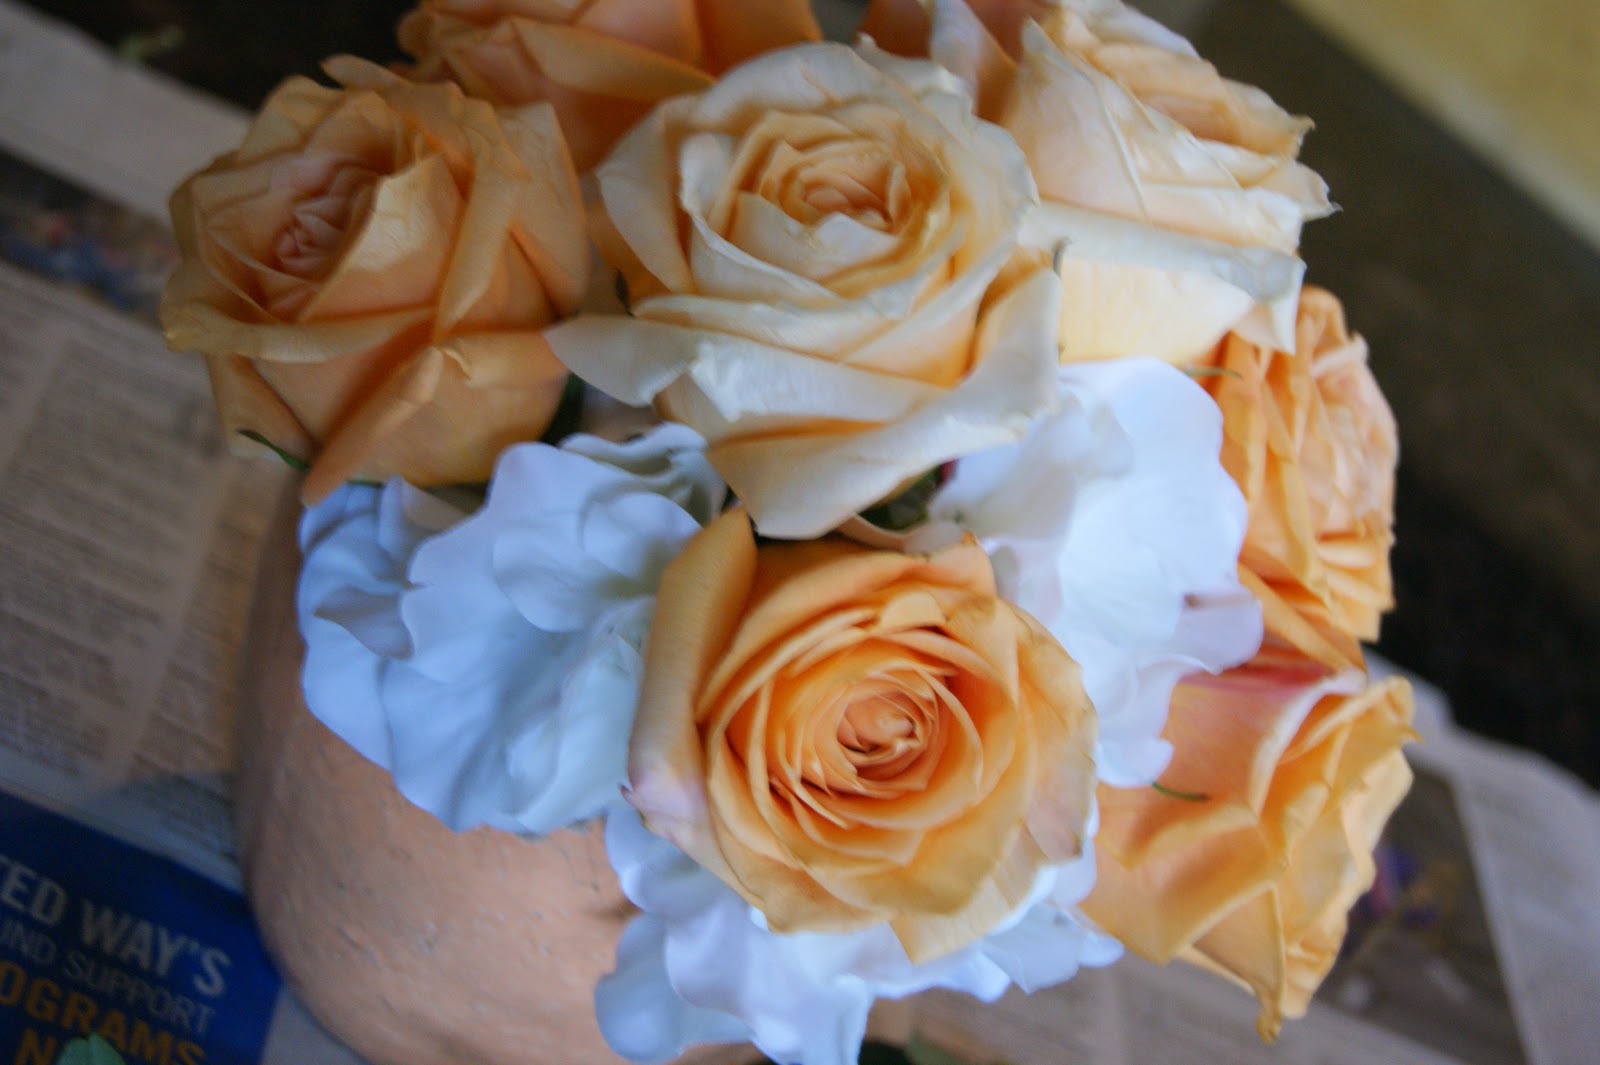
Looks real doesn't?
 I found this bunch of roses at Walmart right after Mother's Day for only $2.98
 Use any container of your choice.  I found this one at Good Will for only .98 cents!  When ever I come across unique vases or pots I tend to grab them.
 To start fill your vase or pot with water.  Now here's the secret to keep your cost down!!  Are you ready?  
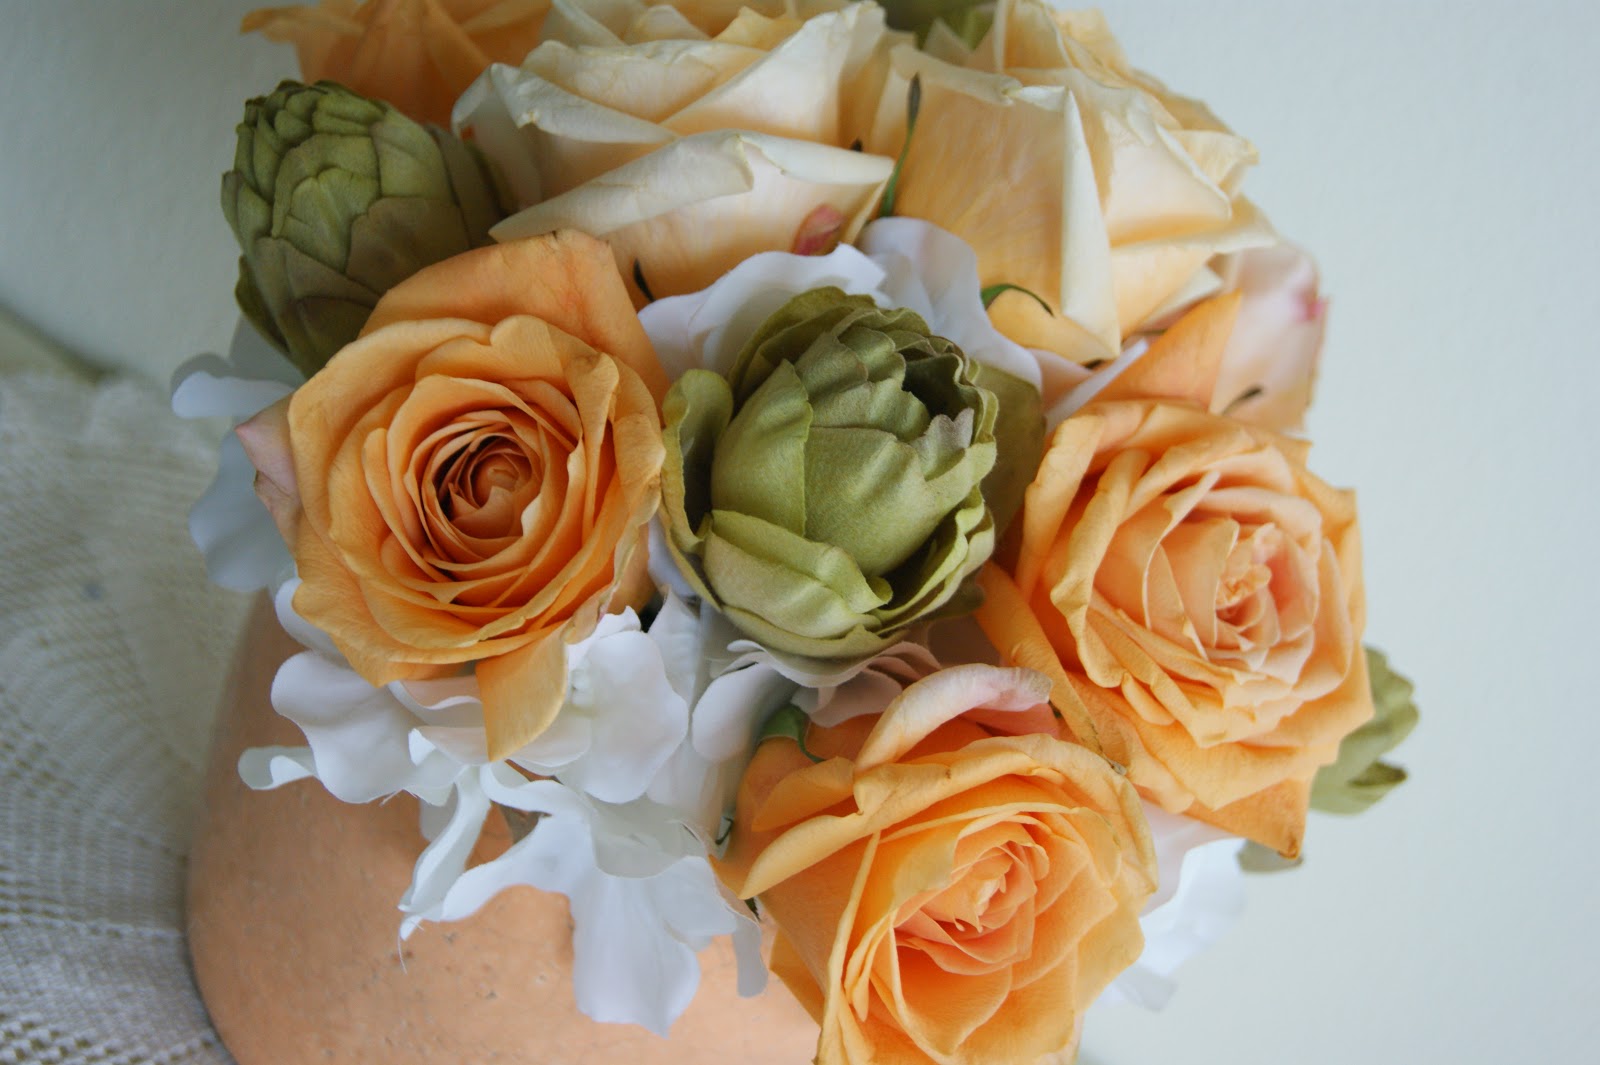
Use one or two large ARTIFICIAL hydrangeas.  (This is yet one more thing I'll usually grab at a thrift store when I see them.)  I know I'll always use them over and over in my fresh arrangements.  To start place them in your pot.  This is beneficial in two ways.  One, you can use the hydrangea as your grid.  Two, it fills in all the open spaces in between your roses.  And I guarantee, nobody will ever notice.  So using the hydrangea as your grid one by one, cut your rose stems on an angle and weave them into the hydrangea blossoms.
 Looking gorgeous, isn't it?
 One more thing I pulled out of my artificial flower stash, these small artichokes.  They add so much texture and the color contrast is perfect.
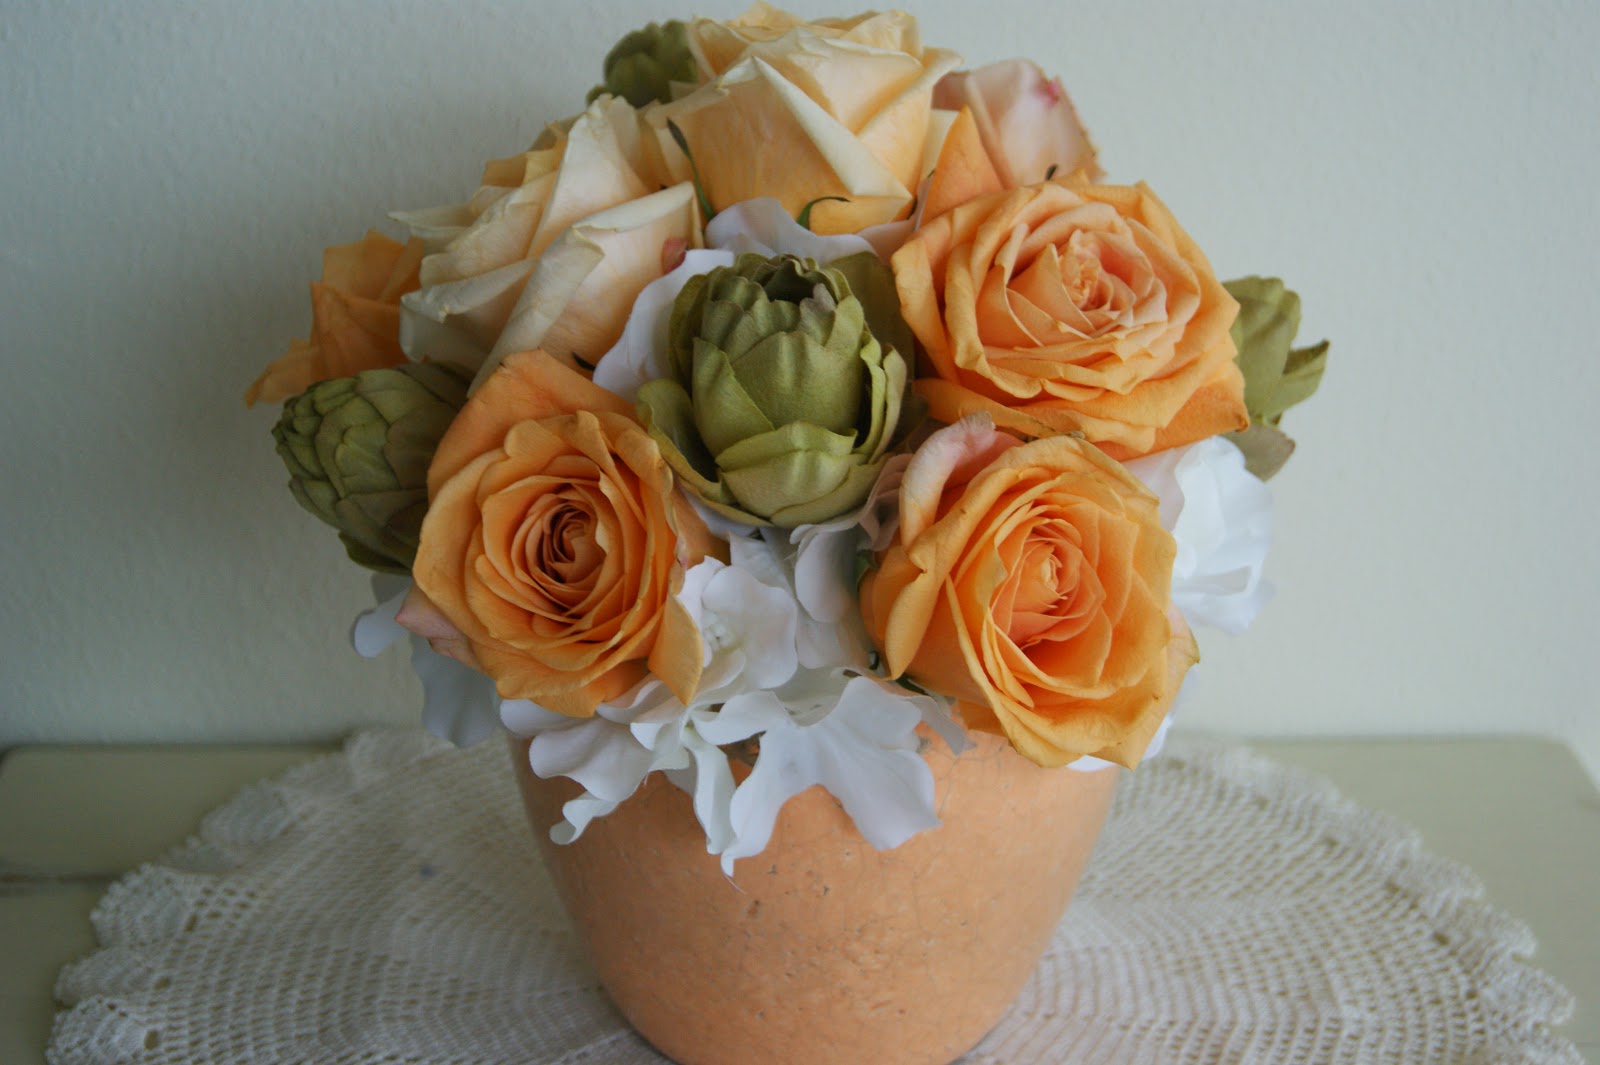
Now looking at the final product, you hardly notice the artificial hydrangea.  The focal point is definitely these beautiful orange roses.  
Over all, just try to keep a few large artificial flowers (a neutral color) on hand and you can use them over and over.  This arrangement turned out so beautifully and at a cost of only $2.98!!

Wednesday, June 11, 2014

Citrus Bath Salt

It' the prefect season for anything citrus!  Including your bath.  I don't quite take a bath as often as I'd like, but after making this citrus bath salt,  hopefully can squeeze a couple in!  The scent alone makes me want to jump right in!  It's such a simple recipe, I think I'll be making another batch soon!  
Citrus Bath Salt
You want to jump in the bath too, don't you?


I was recently looking to come up with a small gift for a friend and I came across a recipe for citrus bath salt.  I gave it a try and was thrilled with the result.  To gift,  I put the salt in a small mason jar.  I had some remaining salt when I was finished, so I thought I'd give it a try while my girls were in the bath.  Amazing!!  Smelled awesome and was so soft on the skin!  I'd highly recommend you give it a try.  If not for a gift,  just treat yourself!

Here's the recipe,

Mineral Salt
2-3 drops orange essential oil
2-3 drops lemon essential oil
1 Tbs. orange zest
1 Tbs. lemon zest

Monday, June 9, 2014

School's End Treat

The  end of the school year is only days away!!  Are you planning on bringing a treat?  These orange slices will be big hit!  Who doesn't like orange slices?  
Don't feel like making enough for the whole class?  They also make a great teacher gift.  Just use a large bag instead! Easy Peasy!
School's End Treat


 While thinking of a creative treat for the school's end, I happen to see these orange slices at the dollar store.  I thought they would make the perfect school treat.  On my silhouette software I found an image of an orange and added "Orange you glad it's Summer" for the tags.  After putting  the orange slices in small cellophane bags, I added the tag, and tied them off with some twine.  I'm sure all of the kids will love them!!

Friday, June 6, 2014

Titi Crafty

I'm visiting Titi Crafty by Camila today, go pay here a visit!!


Thursday, June 5, 2014

Guest Host

Remember to go take a look at Vintage Zest were I'm Guest Hosting today!!

Wednesday, June 4, 2014

It's "Thyme" To Garden

Just a simple little idea that I thought I'd share with you guys today.  Heading over to a friends house I thought it would be thoughtful to bring a gift.  After contemplating what to bring, it hit me,  a plant!!  She loves to  garden and cook!  This thyme plant would work perfect.  After planting it in this little tin bucket, I added a small tag reading "It's "thyme" to garden"!  I'm sure you know somebody who loves to garden and cook.  Go on, make them one!  They'd love it!!
It's "Thyme" To Garden!


Cute, huh?


Sunday, June 1, 2014

Smore Sticks

Looking for an adorable treat for a barbecue or a camp out?  How cute are these?  There's hardly anything to them, yet they look so cute and taste so good!!  Whether your hosting yourself or going to a party, they make a great treat!!  I mean who doesn't love smores?
Smores Sticks


 While at the grocery store the other day I happen to come across these Pocky sticks (found in the asian food section)  and I thought they were interesting.  I was determined to come up with with something to make with them.  The first thought I had was something along the lines of a smore, seeing that when I tried one it already tasted like the graham cracker and the chocolate.  From there it was pretty simple, I simply poked the sticks right  though some mini marshmallows.  They turned out so cute and tasted great.  Makes a cute gift for a camping  themed party or any summer get together.


Related Posts Plugin for WordPress, Blogger...

Follow by Email

Follow Me On

Total Pageviews

Check out all of my pallets!

Google+ Followers

My Etsy Shop

My Latest Pins!

' $(e).html(html); //correct href for images so they point to Pinterest $(function() { $('.rssFeed a').each(function() { var href = $(this).attr('href'); $(this).attr('href', 'https://www.pinterest.com' + href); $('.rssFeed img').attr('nopin','nopin'); }); }); }; })(jQuery); })(jQuery);

Where I Contribute

This Silly Girl's Life

Grab My Button