02 12

My Recent Posts

Showing posts with label Jewels. Show all posts

Monday, January 19, 2015

Burlap Jeweled Bracelet

Who doesn't love burlap and vintage jewels!  Why not combine two of my  favorite  things into a gorgeous bracelet?  I post this on This Silly Girl's Life o a couple months ago and now I thought I'd share it with you myself!  I think it turned out just beautifully and I'm so excited to wear it!!
Burlap Jeweled Bracelet


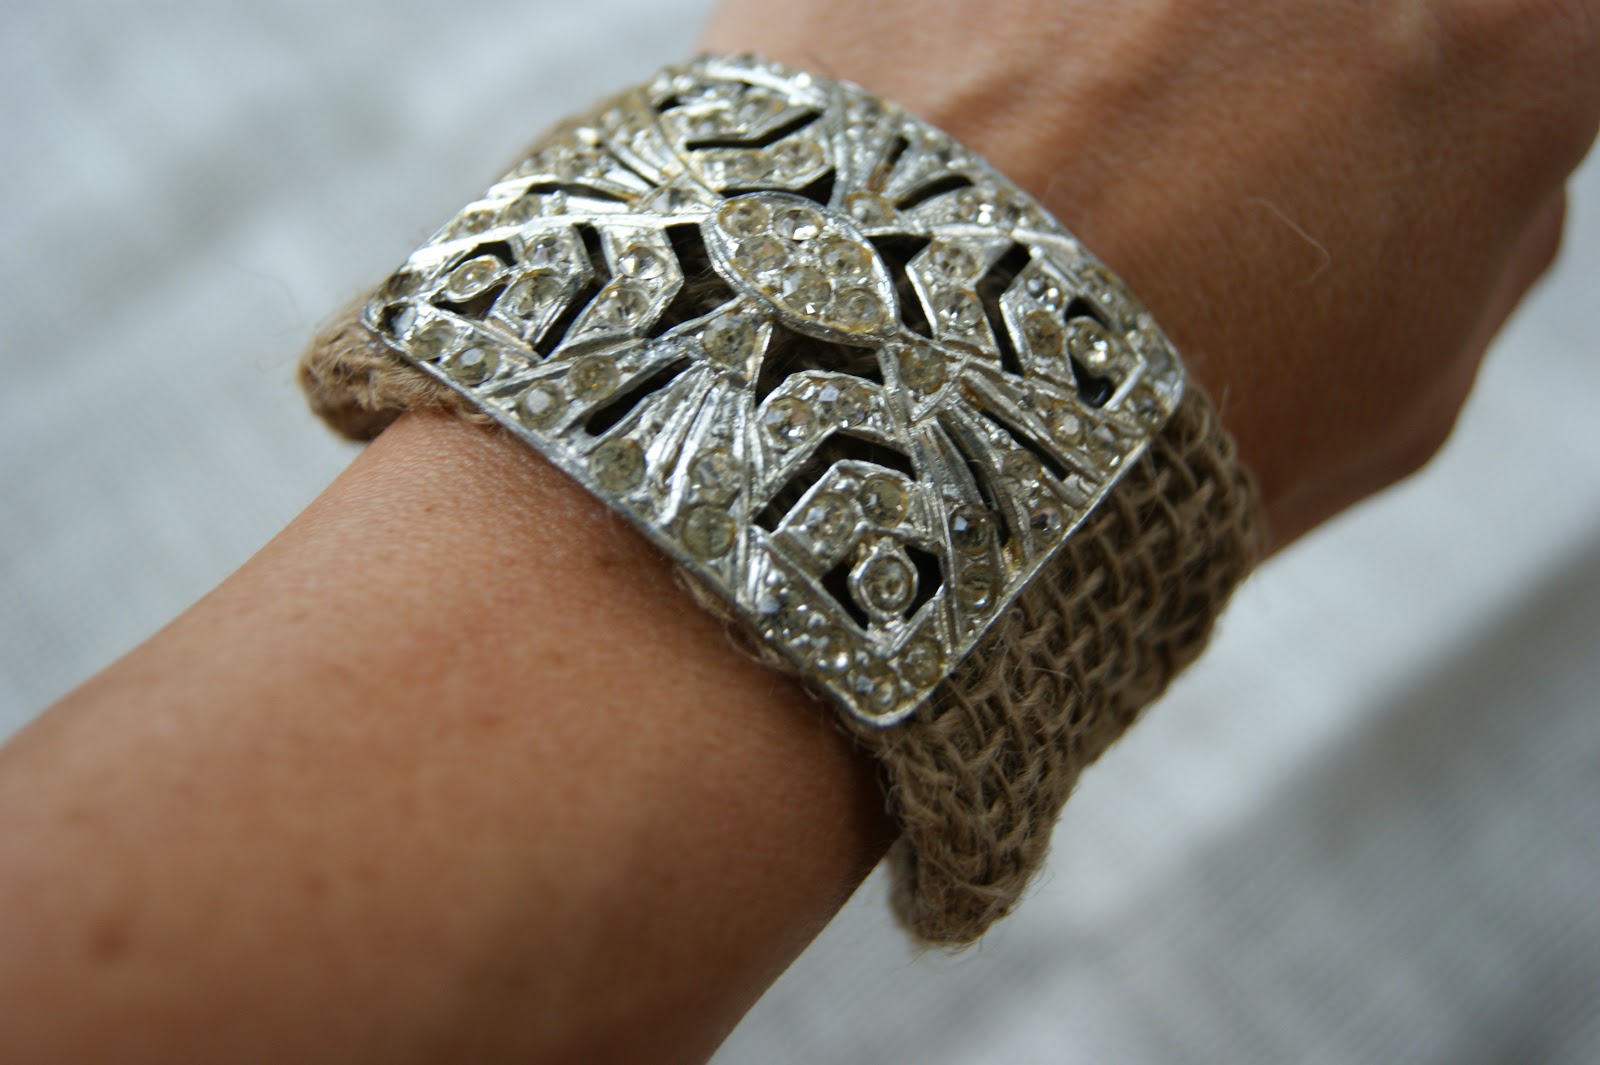
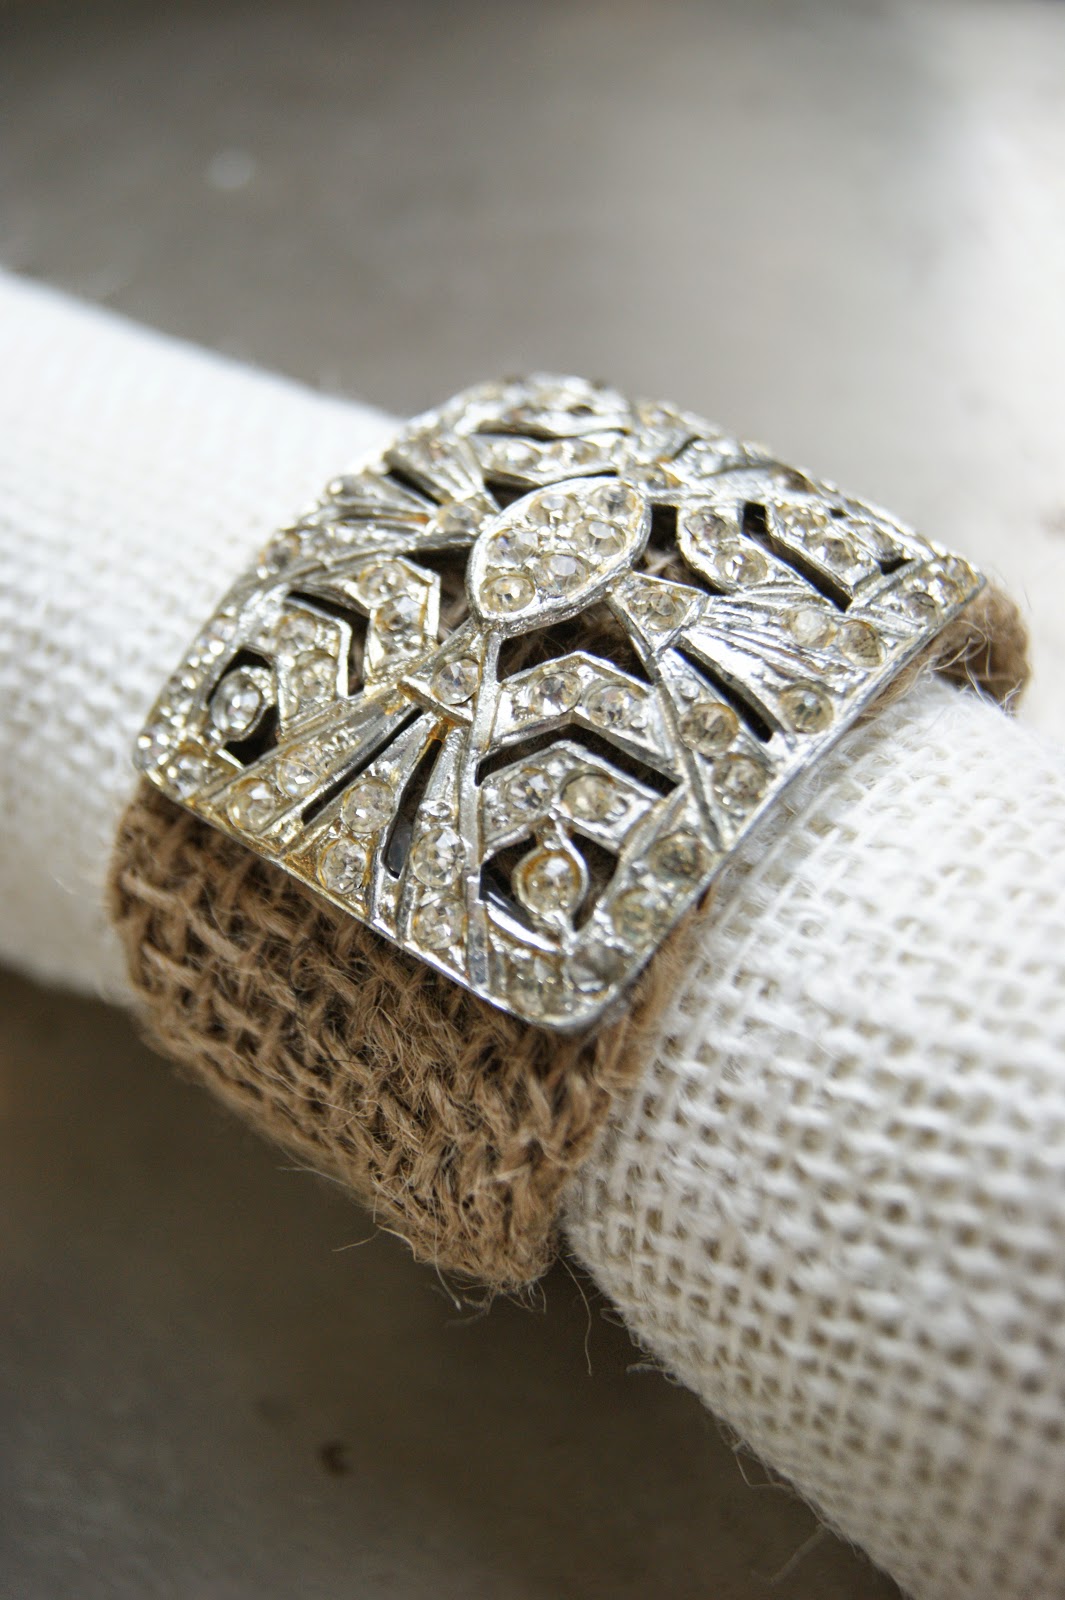
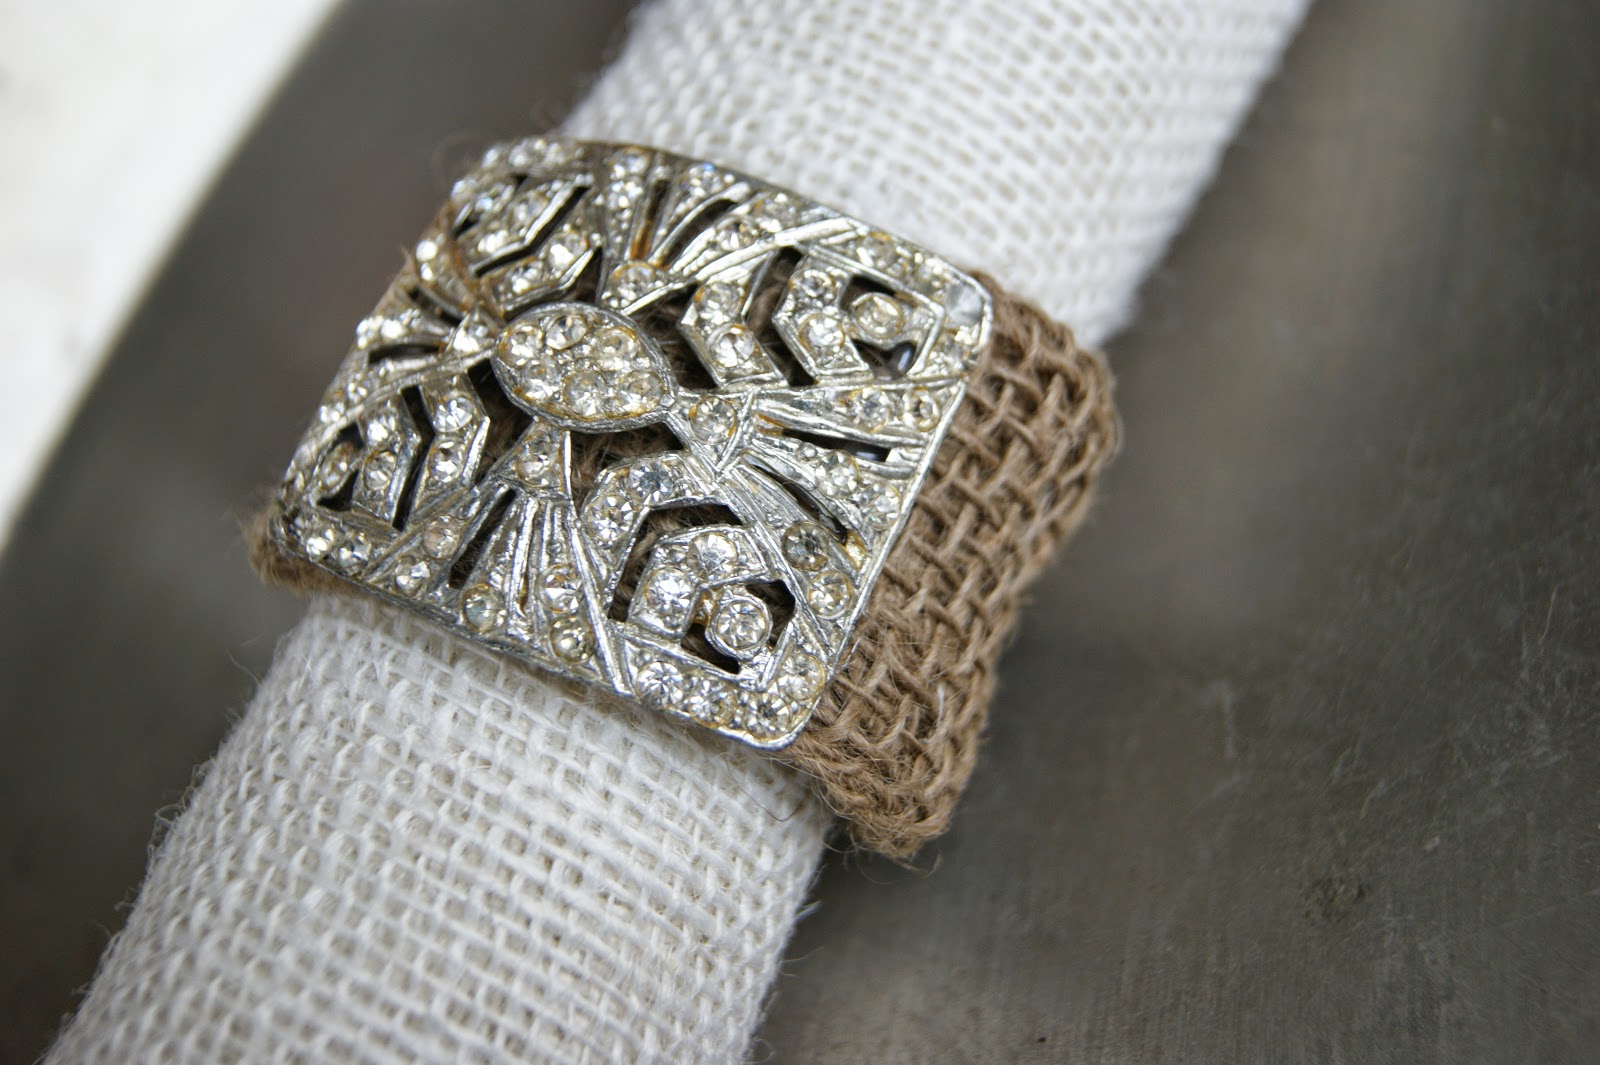
I've had this gorgeous vintage broach laying around and I knew I had to come up with something to do with it.  I decided to go with a bracelet and I'm so happy I did!  To start, I folding the sides of my burlap ribbon in,to match the width of the broach. To secure it, I used some fabric glue.  Next, I had to get the length right to fit perfectly around my wrist.  After getting the length, I slid the buckle on and secured the ends of the buckle with a little more glue. For the raw ends of the burlap ribbon, I bought a large metal claw type closure for the ends.  Find yourself some gorgeous vintage jewels and make one for yourself!


 Find yourself a vintage broach and give it a try.  It's so simple and you'll have yourself a beautiful addition to your jewelry collection!

Monday, September 22, 2014

Tie Bracelet

 I featured these bracelets on Titi Crafty back in June and Wanted to share them with you myself.  Can you even believe this gorgeous bracelet came from a men's tie!!  While flipping through a magazine in line at the grocery store the other day, I came across these awesome bracelets. I loved them so much and knew I had to give one a try.  There's a world of old ties out there that nobody wants, think of all the bracelets we could make? 
Tie Bracelet
 You know you want one for yourself!


I knew my husband wasn't about to let me chop his ties up so I headed to Salvation Army.  Ties are only $.99!  Go to any thrift store (ties are always pretty cheap).  I found a couple that I thought would work out great for my bracelets.  

Even if you are not a sewer, these are such a simple project to make.  Start out by wrapping the narrow end of the tie around your wrist to get the approximate length that you'll need.  Add about 1/4 of an inch extra, and cut your tie.  Using fabric glue, take your raw edge and glue it under.  You could always sew it, but I chose glue since I'm not much of a sewer.  Using sticky velcro, place one on each end of the bracelet.  Make sure it's a good size before applying your velcro for good.  When your bracelet is complete, add a jewel, a large button, buckle, or maybe a fabric flower for a focal point?  

What a gorgeous new bracelet for only 99 cents!  What a deal!!
These tie bracelets would make such a unique gift!!  Maybe try a few for yourself and a few for gifts.  I know any girl would love one!!  Have fun and go save some ties!!

Monday, April 28, 2014

Braided Fabric Vintage Bracelet


 A couple months ago you may have seen my post with my fabric flower and jeweled necklace.   I loved it so much I decided to take a look threw my vintage jewels and see what else I could make with them.  I came across this beautiful pin and knew it would make an awesome bracelet.  I cut off the brackets to the pin with a wire cutters, than added hooks to each end.  I ripped three strips of white fabric, braiding them together.  I'm not usually much of a jewelry maker so I don't know the correct names for the pieces.  On that note I used "clampy ends" for the ends of my braids.   I loved the way it turned out and can't wait to wear it!!

Friday, March 28, 2014

Fabric Flower and Jeweled Necklace


 My dad stopped by the other day with a whole bin full of gorgeous vintage broaches and earrings.  I had seen these fabric necklaces on pinterest before and I was always very jealous.  I thought I'd take it up a notch and make a similar necklace but add all of these beautiful vintage jewels.  
 To start out, I made my fabric flowers and picked out some coordinating jewels.  I made a white felt backing to glue my flowers onto.  After the flowers were on, I played around with the layout of the jewels.  When I found a good spot for them, I attached them with hot glue.  It turned out just gorgeous and I can't wait to wear it!!

Thursday, February 20, 2014

Pink Yarn Wreath


 I've been looking to make some new decor for my daughters room, so I decided to take a look around and see what I had to use up.  I found a 12" foam wreath, which I thought would be perfect.  I had some pink yarn to use to cover it and some scrap fabric to add some accents.  And like always, added a vintage jewel to top it off.  The perfect addition to her room I was looking for!!
Order one of your own at my etsy shop, Craft Crazed Mom.

Friday, August 30, 2013

Jeweled Lamp Shade


 The lamp in my dining room was looking kind of plain.  It just needed a little sprucing up!  One thing I never pass up at a flea market is old vintage jewels.  They usually brake down to about under .50 each.  What a deal!!  As for the fabric flowers, they were made out of some scrape fabric.  The process of making them I will do my best to explain to you.  I know I really should have taken some pictures.  I cut my fabric into many circles about 1 1/2 inch diameter.  I used one circle for my base which I'm going to attach the remaining circle to.  With the rest of the circles, start by putting a dab of hot glue in the center of your circle. Quickly, before your glue sets, fold the circle in half.  Next, put another dab of glue in the center of your half circle and quickly folding it one more time, creating a quarter circle.  Once you have all of the rest of your circles folded into quarters, you can start attaching them to your base circle.  The point of your quartered circle should be in the center of your base circle.  Once it looks full enough to you, take your jewel and glue it in the center of your fabric flower.  As far as my lamp and my shade, I found both at good will for only two dollars each.  Overall, this beautiful lamp came to under $6.00!
Related Posts Plugin for WordPress, Blogger...

Follow by Email

Follow Me On

Loading...

Total Pageviews

Check out all of my pallets!

Google+ Followers

My Etsy Shop

My Latest Pins!

' $(e).html(html); //correct href for images so they point to Pinterest $(function() { $('.rssFeed a').each(function() { var href = $(this).attr('href'); $(this).attr('href', 'https://www.pinterest.com' + href); $('.rssFeed img').attr('nopin','nopin'); }); }); }; })(jQuery); })(jQuery);

My Etsy Shop

Where I Contribute

This Silly Girl's Life

Grab My Button