02 12

My Recent Posts

Showing posts with label Burlap. Show all posts

Monday, January 19, 2015

Burlap Jeweled Bracelet

Who doesn't love burlap and vintage jewels!  Why not combine two of my  favorite  things into a gorgeous bracelet?  I post this on This Silly Girl's Life o a couple months ago and now I thought I'd share it with you myself!  I think it turned out just beautifully and I'm so excited to wear it!!
Burlap Jeweled Bracelet


I've had this gorgeous vintage broach laying around and I knew I had to come up with something to do with it.  I decided to go with a bracelet and I'm so happy I did!  To start, I folding the sides of my burlap ribbon in,to match the width of the broach. To secure it, I used some fabric glue.  Next, I had to get the length right to fit perfectly around my wrist.  After getting the length, I slid the buckle on and secured the ends of the buckle with a little more glue. For the raw ends of the burlap ribbon, I bought a large metal claw type closure for the ends.  Find yourself some gorgeous vintage jewels and make one for yourself!


 Find yourself a vintage broach and give it a try.  It's so simple and you'll have yourself a beautiful addition to your jewelry collection!

Monday, October 27, 2014

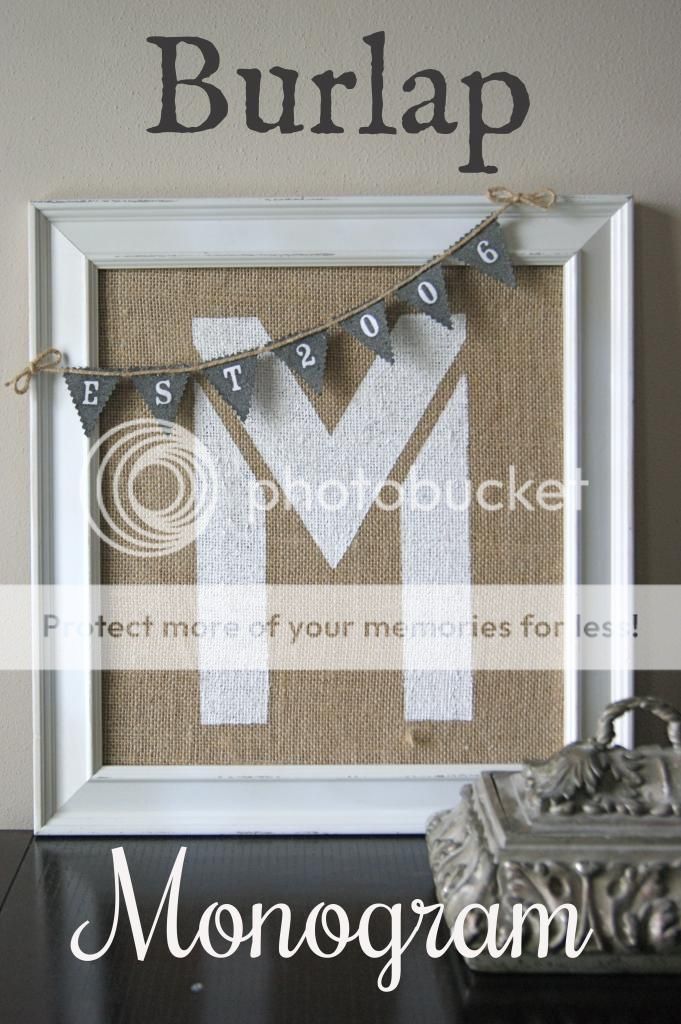
Burlap Monogram Picture

One of my girlfriends had me make one of these for a friend's birthday, and I thought why not share it before I send it on it's way.  Everybody loves burlap and and monograms, why not combine the two into a gorgeous picture like this!  Of course the banner makes it that much more personal by adding the year of your wedding.  
Burlap Monogram

 For the process of making this project, you will need:
1 picture frame
burlap fabric
white fabric
paint colors of your choice
 Start out by taking the glass out of your frame.  Spray the glass with adhesive spray and lay your burlap fabric onto it, leaving about an inch to fold over your edges.  Turning it onto the back side, use your adhesive spray to glue your edges down.  Place your covered piece of glass back into the frame.
With the paint color of your choice, use a large stencil to paint on the monogram.  As for the banner, cut seven small triangles out of your white fabric.  After there cut out, place stickers onto the fabric pieces, reading "EST 20??".  Now that you have your text on, again with the color of your choice, spray paint the fabric banner pieces.  After dry, pull of your stickers, now leaving the white lettering showing.  Use hot glue to glue the banner pieces to a piece of twine.  Add the banner to your frame, and there you have it.  A gorgeous new personalized wall decoration for your home!

Thursday, April 3, 2014

Burlap Easter Bunny Canvas


You may have seen my previous post with my burlap stuffed bunny,  I had some remaining fabric left over that I needed to use up.  I decided to cover a canvas with the left over fabric.  I found a image of a bunny which I traced and cut out of burlap.  After glueing my bunny to the covered fabric, I added a bow and topped it off with a ivory broach.  So simple and so elegant!  Can't wait to put it out!


Sunday, March 2, 2014

Stuffed Burlap Bunny


 How cute is this fabric?  Again, not needing any new fabric at all, I just couldn't resist this one!  I don't even know why I bother walking through the fabric section.  Wondering what to do with it, I decided on a stuffed bunny.  I cut out two matching bunnies, one for each side.  I happen to have some thin foam on hand which I used as stuffing.  Using fabric glue, I simply glued all of the edges together.  Using twine to hang the bunny, and adding a bow for some extra decor, it turned out adorably!  Would make a great door decoration for Easter.
Want one of your own, but don't want to make it?  Go to Craft Crazed Mom!

Monday, February 17, 2014

Heart Burlap Sign


 A long time ago I purchased a four pack of these 6x6 burlap covered signs.  Never doing anything with them, I thought it was time to use them up.  Glitter is so popular right now, so I thought I'd follow the trend.  Starting out by making a heart stencil, I filled it in with the silver glitter paint.  Still looking to plain, I drilled two holes to hang it from and threaded them with twine.  I thought the key would add a little dimension, and it was just what it needed.  Turned out lovely!!
Perfect addition to your home decor, order at Craft Crazed Mom!

Sunday, February 2, 2014

Love Burlap Button Art


 I had make one of these a long time ago, but gave it away as a gift.  I decided it was time to make another one.  I used a ornate old vintage gold frame and backed it with burlap.  Attaching all my buttons to read LOVE!  In the corner I added a gorgeous vintage broach.    Don't have the time to make one, order one online at Craft Crazed Mom.

Wednesday, January 15, 2014

Chevron Burlap Picture Frame


 I had a 8X10 canvas that had been sitting around here, and I decided I could use a new frame.  I took some brown burlap chevron fabric and glued it on to the canvas. I used twine to wrap around the canvas to hang my picture from.  Of course I still wasn't satisfied, so I added a few fabric flowers and a vintage jewel to dress it up!  With a couple of mini clothes pins, I hung my picture!  So simple and so cute!

Give it a try or buy it online at my esty shop Craft Crazed Mom!

Sunday, November 10, 2013

Holiday Burlap Wreath


I've seen so many of these burlap wreaths and I've always wanted to make one of my own.  I started by buying a metal wreath ring and two rolls of burlap ribbon.  The process is so simple.
You start by pulling small loops threw each of the three gaps in the ring.   Work your way around the ring, pushing the fabric aside to give it the fullness you desire.   


After I was done, I found a peace sign that I had and thought it fit the wreath perfectly.I didn't want to glue my sign on for good, allowing me to change it out seasonally.  To attach it, I glued a twist tie to the back to wire it on.  I also added a felt poinsettia, a bow, and a few christmas greens.  Now I have a beautiful wreath I'll be able to use all year round!


Sunday, September 29, 2013

Burlap Ghosts


This weekend my girlfriend (knowing me all to well) forwarded me a picture and link to these adorable burlap ghosts.  They were from knockoffdecor.com .  I LOVED them!!  But I have to admit, I cheated terribly, as far as how much work these were!  The tutorial attached to the link was a lot more complicated.  So I took off for the store to buy the makings as she instructed.  That's when I came across these pre made ghost lights.  I found mine at Target.  As you can see in the picture, they already had a white sheet over the top of the light, and a face already on them!  
At this point, you might be wondering, why change them at all?  But, their just so much cuter with the burlap! 

 I ripped off the white sheet, just leaving the ghost face lights. I then cut out my burlap squares about 10 inches wide.  First removing the head, I poked a hole in the middle of  the burlap with the light, and put the head back on.  Bind the burlap,  tie a twine bow and draw on some eyes to finish them off.  

Now what do you think?  So much cuter, Right?


Sunday, September 15, 2013

Polka Dot Burlap Bunting


Today I thought I'd share this polka dot burlap bunting I made.  Starting out with a regular tan burlap, I cut out your typical bunting style triangle.  A pinking sheers giving me that jagged edge I was looking for.  Using spray paint, I painted them a variety of colors to make a few different strings.  After they were all dry, with a small circle sponge, I simple added some random polka dots to dress them up.  To finish them off, I hung the triangles on some twine and attached them with small clothespins.  They look really cute in children's room, and are another great gift idea for new mom's. 

Wednesday, September 11, 2013

Burlap Jars


Over time I pick up old of unique jars if a come across them.  Dressing them up with a little burlap, lace, twine or ribbon can add so much.  After I was done, I felt they still need a little something else.  My jar of old vintage jewels came to the rescue again.  They added the perfect touch.
Related Posts Plugin for WordPress, Blogger...

Follow by Email

Follow Me On

Loading...

Total Pageviews

Check out all of my pallets!

Google+ Followers

My Etsy Shop

My Latest Pins!

' $(e).html(html); //correct href for images so they point to Pinterest $(function() { $('.rssFeed a').each(function() { var href = $(this).attr('href'); $(this).attr('href', 'https://www.pinterest.com' + href); $('.rssFeed img').attr('nopin','nopin'); }); }); }; })(jQuery); })(jQuery);

My Etsy Shop

Where I Contribute

This Silly Girl's Life

Grab My Button